We’re going to over some fertiliser best practices. Some of these you may already be implement, some you may know (but its a good reminder), and some ideas might be new. And some you may not agree with.
Questions, comments, disagreements comment below or shoot me an email chris(at)vintality.ca
P.S. A lot of the application also applies to foliar as well.
Let’s get to it.
Table of Contents
One - Watch and Record
Recording and monitoring your vineyard throughout the year is the simplest, most effective, cheapest thing you can do to get the most out of soil sampling results and maximise your fertiliser applications.
Let me repeat this: record and monitor the health and behavior of your vineyard throughout the year.
Have a notebook you carry around with it. Keep a computer file with observations: location, symptoms, date, stage of growth cycle. Were you seeing issues on older leaves or younger? How are the grapes developing – balanced or ripening unevenly?
It’s like dieting: we all know that we should eat less sugar and exercise more. Do that and you’ll accomplish 90% of what any diet will do for you. Yet, we’d often rather follow complicated diet plans (hopping from plan to plan) rather than following the super simple (but slightly harder) first steps. Don’t eat much sugar, carry a notebook around your vineyard. Best life advice I’ve got.
The truth is that the first stage in understanding your vineyard is what your plants are telling you. Color fading at the edge o your more mature leaves? Might be potassium deficiency. Hens and chickens? Possibly a zinc uptake issue. Perhaps the plant looks healthy but the grapes are too acidic or lack punch. After all, a great rule of thumb for plant health is if the flavors pack a whallop. When we eat tomatoes that taste like grass that’s a strong indication of nutrient deficiency.
Now, because we’re dealing with organic systems there is rarely one clear, obvious answer. Color fading at the edges of leaves might be potassium deficiency – or it might be magnesium excess (interfering with potassium uptake). Or one of 30 other things. But being able to compare plant symptoms to soil (and petiole) sampling is a major leg up in understanding what’s happening. Soil samples divorced form this information are half as useful (more on this later).
Like Sherlock Holmes, we are trying to solve a mystery. And doing (and having done) the work of noting vineyard behavior throughout the seasons is the leg work.
There’s no better time to start than now.

Two - Compare Year to Year
This may seem obvious but some people forget. Much like observing plant symptoms, comparing past vineyard interventions to current sampling results is a must.
Your vineyard has a history and what you’ve been fertilising with is a key part of that history. Granular and liquids (direct or fertigation) are the most important. But foliar is as well – even though it doesn’t affect the soil a nutrient deficiency may not be presenting because its been addressed via foliar.
Aside: It’s important to remember that fertiliser applied in the spring is going to do little to the vineyard that year. It can have some effect on wine characteristics and improve winter hardiness, but overall the health and quality of the plant is not affected by spring fertilisation. What you are doing by fertilising in the spring (other than changing flavor characteristics) is setting up the vineyard for success the next year.
By looking at past vineyard interventions, we’re able to compare what’s been done and what effect its had in the vineyard. Of course, having historical soil reports is even more advantageous. This way, we can track how soil interventions have changed (or not changed) the terroir.
A simple example is a vineyard that is showing Potassium deficiencies in the soil that have not changed in 4 years. Increasing the ratio of the K in the NPK is an obvious solution (or changing the type of potassium fertiliser applied). Of course, if you’re growing quality grapes you’re doing a lot more than applying an NPK.
Understandably, fertiliser companies want to sell you more fertiliser. But by comparing soil sampling results to past soil interventions tweaking (and sometimes decreasing) applications is often an effective solution. Don’t assume just because there’s a deficiency issue that more fertiliser is always the answer.
Three - You Need More pH (samples)!
I’ll keep this short.
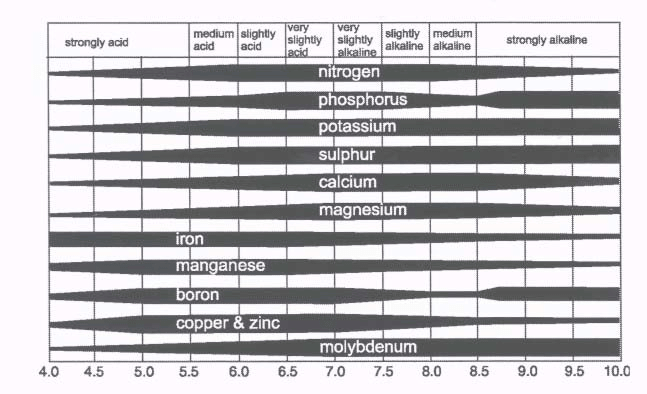
Soil pH can have an outsized effect on nutrient availability for plants. Because vines release a weak acid to breakdown and uptake nutrients, too much Hydrogen (as in pH) makes this much harder. As an aside, this is also how Sulphur works by converting to S04, absorbing H (but is eventually neutralized).
In particularly acidic or alkaline soils attempting to adjust pH can sometimes do more than major fertiliser programs. This is particularly true for micronutrients which are more susceptible to extreme soil pH (see chart below). We all know that pH adjustments are temporary but that doesn’t make them useless. And after all, we spray foliar which doesn’t last.
(If you have experience with effective techniques for modifying beyond sulfur/lime applications I’m all ears.)
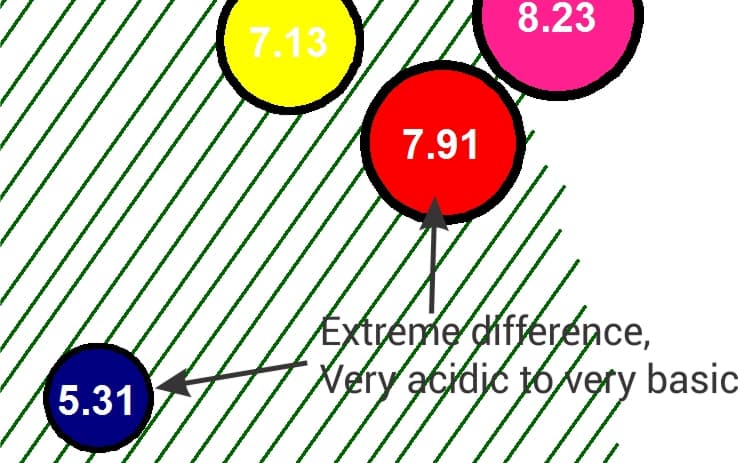
There’s more reason to take more frequent pH samples though. Because we believe in much more comprehensive sampling we will often see significant pH differences within a single vineyard (including small ones). One vineyard we recently did had very alkaline soil (8.0+, typical for the area) throughout, yet had a tongue of very low pH (<6.0) through the side of the vineyard. Likely due to a granitic intrusion, this section will always struggle if treated the same as the rest of the vineyard. There are going to be significantly different nutrients bioavailable to the plant in the acidic section. Without this information. it would be near impossible to have both sections thriving when receiving identical treatment.
Four - Measure Twice, Dig Once
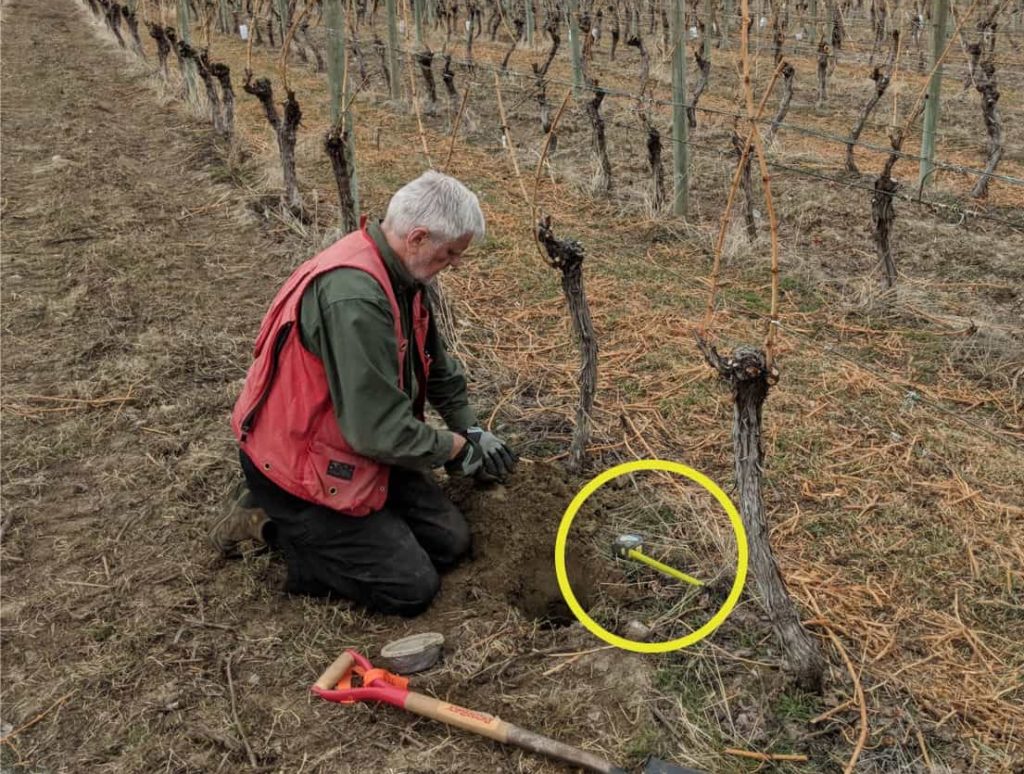
A huge, huge issue rarely discussed in soil sampling is the importance of a consistent and repeatable method when sampling.
We recommend a depth of 10-30 cm below the organic layer. It is important that you do not sample the organic layer, although this is non-existent in many layers. While for our bioavailability sampling we measure to a precise depth, in standard sampling taking your soil from about a foot below the organic layer is fine. While there can be reasons to sample at different depths (for example: it can be an interesting case study to compare samples from the same area at various depths) because plant available nutrients are more available higher up this is where we typically recommend sampling.
Let me repeat this again: if you’re sampling inconsistently your results will be inconsistent and much less useful. If you’re spending the money on sampling – do it right. Think of all the money being potentially wasted because your sampling technique is inconsistent and thus fertiliser results sub-optimal. Whatever sample depth you decide to take, make sure each sample is from within the same range.
As all our grandfathers said: measure twice, cut once.
Five - GPS Your Samples (Don't Blend)
One of the great frustrations we have is when a vineyard will take a few samples throughout the vineyard and then blend them before submitting them for analysis. Sometimes this is economically necessary for very small vineyards that can’t afford more accurate, comprehensive samplings. But in all other cases: DON’T YOU DO IT!
Mixing your samples is like trying to hit a target 200 feet away using a shotgun.
Instead, what we strongly recommend is spot sampling with GPS. If you don’t own a GPS, there are many free apps for your phone (iPhone, Android).
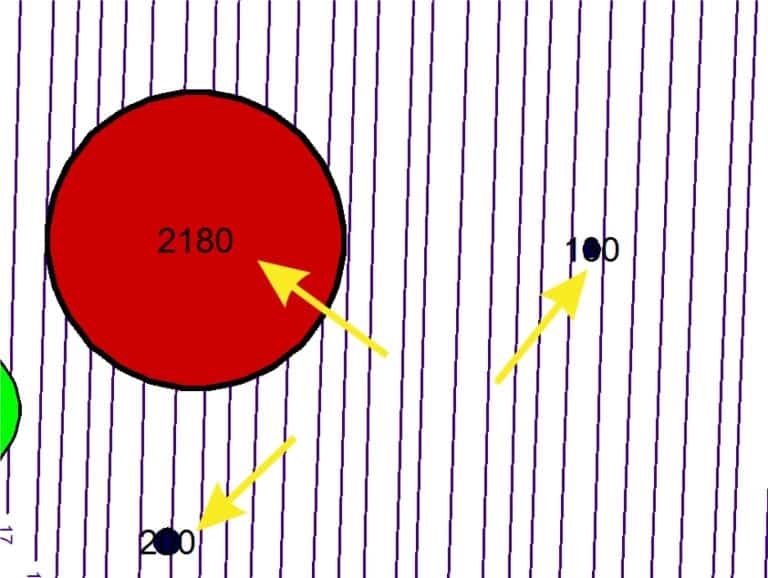
The reason being that there is huge variation within every vineyard: soil type, rootstock, geography, geology, nutrients, etc. By keeping precise records of where our samples (and thus results) are from this allows us to actually investigate what’s going on in the specific areas of the vineyard. You can see that in the example below, where we see a different Zinc value of over 20x almost adjacent to each other. And this is far from the biggest nutrient difference we’ve seen.
This is also incredibly important for historical records. I can’t tell you how often when examining a clients historical sampling they are unable to tell us where the results are from. Even if you know which block the sample was from, there is still likely significant variation within the block. Even if you’re taking the sample repeatedly from the same block, just being rows away can create problems.
Like sampling depth above, GPSing your samples is key to being more rigorous and scientific in managing your vineyard.
Bonus (1): What Are Your Reference Ranges?
We’re going to write a larger blog post about reference ranges so I’ll keep this short.
When you get your sampling results back, do you know what the reference ranges are based upon? When it says “high” – what does that mean? If it includes fertiliser recommendations, where are these recommendations coming from? For example, in Canada while the Ontario government has soil recommendations, B.C. does not.
Further, results can use generic plant guidelines (perhaps based on annual crops) using research with non-vineyards – and thus not be particularly useful. Further, “high” and “low” are very much affected by pH which in particularly acidic or alkaline soils may not be taken into account. In fact, soil pH can even be a problem for the extractant used to measure the nutrient level.
Lastly, what philosophy are the recommendations based on? For example, is it a “sufficiency” (bare minimum) approach (used by Ontario). Or base saturation? Or a build-and-maintain approach?
This can seem like a lot, but taking 20 or 30 minutes to call your local fertiliser provider or sampling lab is all it can take. And if they can’t answer, that should give you pause.
Bonus (2): Every Few Years, Comprehensively Sample
Where economically feasible, we strongly recommend (at least every few years) taking a comprehensive grid sampling of your vineyard. There can be massive nutrient variation within a vineyard – we’ve seen a 2000% difference only a few rows over. You can imagine what would happen to your vineyard management if you took only one of those samples (or mixed them).
The sampling rate is dependent on vineyard size (and economics) but we typically recommend a range of 0.25 samples/acres to 2 samples/acre. A very rough guide: <10 acres, 0.25 samples/acre; 10-20 acres, 0.5 samples/acre; 21-50 acres, 1 sample/acre; >50 acres, 2+ samples/acre.
And if you’re making premium wine, certainly sampling more often can help identify specific problem areas (and reproduce high quality areas). We call this “fingerprinting”.
If a row of grapes is worth $25,000 spending a little extra time and money to improve the quality and quantity is a no-brainer.
Conclusion - tl;dr
Okay, to recap:
- Record what’s happening to your vineyard throughout the season
- Compare to what you’ve put down in your vineyard throughout the past couple of years
- Take more pH samples
- Dig at a specific depth
- GPS your samples (lets you build up a historical record)
- Bonus: Understand your reference ranges
- Bonus: Take more than 3 or 4 samples, don’t mix them